 Materials:
Thaddeus Cooper 12x12 Kit
Thaddeus Cooper Elements 3 border cluster
The next screen that you see is where you determine what size of page you want.
The next thing is to drop your cluster onto your page. Follow the path File>Place> then search for your pre-made cluster and “place” it onto your page.
Once you place your cluster onto your blank page, you will need to select the red check mark, or “commit current operation.”
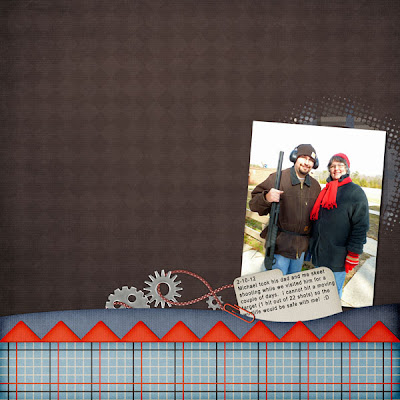
Next, drop the picture in. Move it around until you like the placement. But, nothing is set in stone, yet. You can move it around any time til your page is just right for you.
Now its time to drop in a background paper. File>Place>select your paper>Place. (I like to move my window over and turn the thumbnails on so I can judge what paper(s) might look best in the layout.)
Change the order of your layers to make the background paper go behind the photo. I was not excited about the border cluster being vertical. So, I decided to try it along the bottom. Making sure the cluster layer was the active layer in the layers palette, I chose Image>Rotate>Layer 900 Left. This would turn it so I could place it against the bottom of the page.
I do like that much better. So, I added a grungy element behind the photo, added some drop shadowing (see drop shadow settings to the right in the print screen below) and added my journaling on the tag and Voila! All done! A nice, clean layout in no time at all! I could further add a nice, bold title anywhere on the page.
Let’s discuss the journaling on the tag just a bit more. Since this is a border cluster and everything is together, I had no choice but to have my journaling lay on top of the cluster, I zoomed in so I could delete some of the type to make it look like it was on the tag and under the paper clip and border paper. First, simplify the text layer by doing a right click on the text layer in the layers palette then select Simplify from the list. No, using the Polygonal Lasso Tool, I traced around the paperclip (you have to look really closely at the print screen to see the marching ants for the selection), with the text layer active, and deleted. Use ctrl+D to deselect and get rid of the marching ants box. (NOTE: To select the portion of the “w” that is laying on top of the border paper at the same time you selected the area around the paperclip, use the shift key to start your selection for the “w.” This will keep the first selection active and you can hit the delete button once.)
Now, it looks like the type is on the tag which is layered behind the paperclip and the blue border paper, even though we know it’s really on top! Shhh!! Don’t tell anyone! It’s our little secret! :D
Hope that helped you some with what to do with pre-made clusters! And, I hope you can use some of the other little tips I included throughout this tutorial!
Please share this tutorial via the buttons below. THANKS for stopping by Today! :D


I love your tutorials. They help me so much. Thanks.
ReplyDeleteI am so glad they help! I remember being so lost when I first bought PSE!
ReplyDelete